 |
Differences between user-defined bridges and the default bridge
User-defined bridges provide better isolation and interoperability between containerized applications.
Containers connected to the same user-defined bridge network automatically expose all ports to each other, and no ports to the outside world. This allows containerized applications to communicate with each other easily, without accidentally opening access to the outside world.
User-defined bridges provide automatic DNS resolution between containers.
Containers on the default bridge network can only access each other by IP addresses, unless you use the --link option, which is considered legacy. On a user-defined bridge network, containers can resolve each other by name or alias.
Containers can be attached and detached from user-defined networks on the fly.
During a container’s lifetime, you can connect or disconnect it from user-defined networks on the fly. To remove a container from the default bridge network, you need to stop the container and recreate it with different network options.
Each user-defined network creates a configurable bridge.
User-defined bridge networks are created and configured using docker network create. If different groups of applications have different network requirements, you can configure each user-defined bridge separately, as you create it.
Linked containers on the default bridge network share environment variables.
Containers connected to the same user-defined bridge network effectively expose all ports to each other. For a port to be accessible to containers or non-Docker hosts on different networks, that port must be published using the -p or --publish flag. source: https://docs.docker.com/network/bridge/
Create bridge network
sudo docker network create --driver bridge alpine-net
View the network list
sudo docker network ls
View the alpine-net network details
sudo docker network inspect alpine-net
Create 3 container with:
1. alpine1 container connect to default bridge network
2. alpine2 container connect to alpine-net network
3. alpine3 container connect to network default bridge and alpine-net
sudo docker run -dit --name alpine1 alpine ash
sudo docker run -dit --name alpine2 --network alpine-net alpine ash
sudo docker run -dit --name alpine3 alpine ash
sudo docker network connect alpine-net alpine3
View network bridge details
sudo docker network inspect bridge
view network alpine-net details
sudo docker network inspect apline-net
Enter the alpine3 container and ping alpine1 ip, alpine1 and alpine2 name
sudo docker attach alpine3
ping IP alpine1
ping -c 3 172.17.0.2
ping name alpine1
ping -c 3 alpine1
ping alpine2 name
ping -c 3 alpine2
Enter the alpine2 and ping to alpine1 IP and ping to the internet
# ping -c 3 172.17.0.2
failed, because different bridge network and subnet
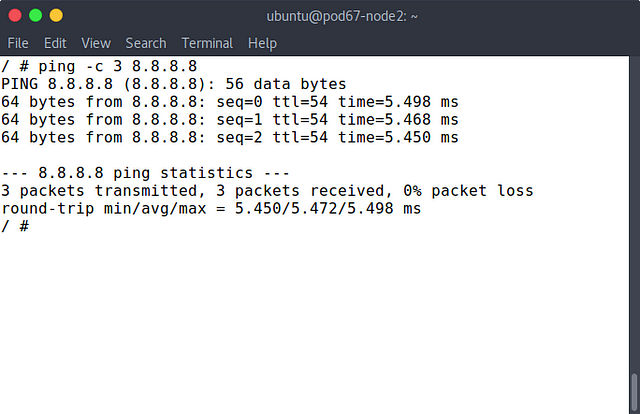 |
ping internet will be succeed.
# ping -c 3 8.8.8.8
ping internet will be succees.
reference : https://docs.docker.com/network/bridge/
0 comments:
Post a Comment