Overlay Network without Swarm mode

The overlay network driver creates a distributed network among multiple Docker daemon hosts. This network sits on top of (overlays) the host-specific networks, allowing containers connected to it (including swarm service containers) to communicate securely. Docker transparently handles routing of each packet to and from the correct Docker daemon host and the correct destination container. see detail https://docs.docker.com/network/overlay/

This way of using overlay networks is not recommended for most Docker users. It can be used with standalone swarms and may be useful to system developers building solutions on top of Docker. It may be deprecated in the future. source: https://docs.docker.com/v17.09/engine/userguide/networking/#an-overlay-network-without-swarm-mode


Network Graph


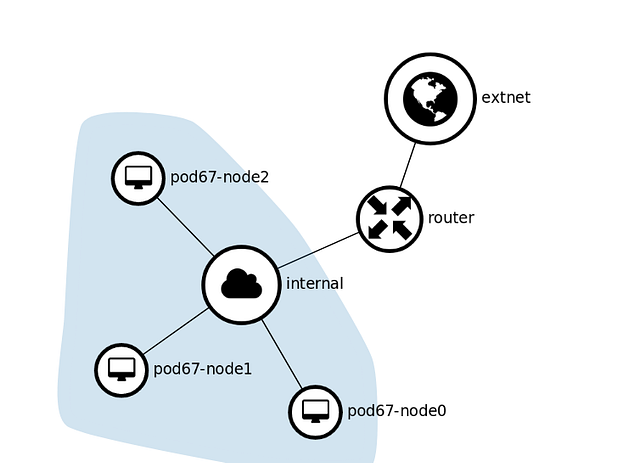
On pod67-node0 run key-value store consul

sudo docker run -d -p 8500:8500 -h consul --name consul progrium/consul -server -bootstrap

On pod67-node1 and pod67-node2 disable docker service and run docker from CLI

sudo systemctl stop docker
sudo systemctl status docker
sudo dockerd -H tcp://0.0.0.0:2375 -H unix:///var/run/docker.sock --cluster-advertise ens3:2375 --cluster-store consul://10.1.67.100:8500 &

On pod67-node1 create overlay network

sudo docker network create -d overlay — subnet=192.168.67.0/24 my-overlay

View networks

sudo docker network ls

on pod67-node1 create container alpine1 connect to my-overlay network

sudo docker run -dit --name alpine1 --network my-overlay alpine ash

On pod67-node2 create container alpine2 connect to my-overlay network

sudo docker run -dit --name alpine2 --network my-overlay alpine ash

On pod67-node2, view my-overlay network details

sudo docker network inspect my-overlay

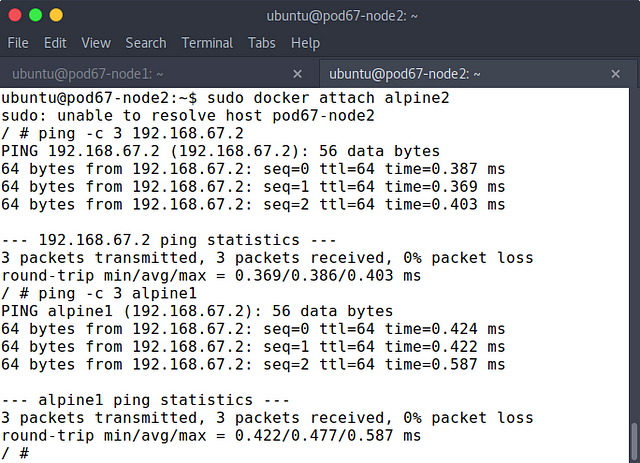
On pod67-node2 enter the alpine2 container and ping to the IP address alpine1 container

sudo docker attach alpine2
ping -c 3 192.168.67.2
ping -c 3 alpine1
test ping to alpine1

reference :

https://docs.docker.com/v17.09/engine/userguide/networking/#an-overlay-network-without-swarm-mode

https://docs.docker.com/network/bridge/

Share:

User Defined Bridge on Docker Network


source image : deploybot.com

Differences between user-defined bridges and the default bridge

User-defined bridges provide better isolation and interoperability between containerized applications.

Containers connected to the same user-defined bridge network automatically expose all ports to each other, and no ports to the outside world. This allows containerized applications to communicate with each other easily, without accidentally opening access to the outside world.

User-defined bridges provide automatic DNS resolution between containers.

Containers on the default bridge network can only access each other by IP addresses, unless you use the --link option, which is considered legacy. On a user-defined bridge network, containers can resolve each other by name or alias.

Containers can be attached and detached from user-defined networks on the fly.

During a container’s lifetime, you can connect or disconnect it from user-defined networks on the fly. To remove a container from the default bridge network, you need to stop the container and recreate it with different network options.

Each user-defined network creates a configurable bridge.

User-defined bridge networks are created and configured using docker network create. If different groups of applications have different network requirements, you can configure each user-defined bridge separately, as you create it.

Linked containers on the default bridge network share environment variables.

Containers connected to the same user-defined bridge network effectively expose all ports to each other. For a port to be accessible to containers or non-Docker hosts on different networks, that port must be published using the -p or --publish flag. source: https://docs.docker.com/network/bridge/

Create bridge network

sudo docker network create --driver bridge alpine-net

View the network list

sudo docker network ls

View the alpine-net network details

sudo docker network inspect alpine-net

Create 3 container with: 

1. alpine1 container connect to default bridge network

2. alpine2 container connect to alpine-net network

3. alpine3 container connect to network default bridge and alpine-net

sudo docker run -dit --name alpine1 alpine ash
sudo docker run -dit --name alpine2 --network alpine-net alpine ash
sudo docker run -dit --name alpine3 alpine ash
sudo docker network connect alpine-net alpine3

View network bridge details

sudo docker network inspect bridge

view network alpine-net details

sudo docker network inspect apline-net

Enter the alpine3 container and ping alpine1 ip, alpine1 and alpine2 name

sudo docker attach alpine3

ping IP alpine1

ping -c 3 172.17.0.2

ping name alpine1

ping -c 3 alpine1

ping alpine2 name

ping -c 3 alpine2

Enter the alpine2 and ping to alpine1 IP and ping to the internet

# ping -c 3 172.17.0.2

failed, because different bridge network and subnet

ping internet succeed

ping internet will be succeed.

# ping -c 3 8.8.8.8

ping internet will be succees.

reference : https://docs.docker.com/network/bridge/

Share:

Default Bridge Network on Docker Networking


source image : deploybot.com
In terms of networking, a bridge network is a Link Layer device which forwards traffic between network segments. A bridge can be a hardware device or a software device running within a host machine’s kernel.
In terms of Docker, a bridge network uses a software bridge which allows containers connected to the same bridge network to communicate, while providing isolation from containers which are not connected to that bridge network. The Docker bridge driver automatically installs rules in the host machine so that containers on different bridge networks cannot communicate directly with each other.
Bridge networks apply to containers running on the same Docker daemon host. For communication among containers running on different Docker daemon hosts, you can either manage routing at the OS level, or you can use an overlay network.
When you start Docker, a default bridge network (also called bridge) is created automatically, and newly-started containers connect to it unless otherwise specified. You can also create user-defined custom bridge networks. User-defined bridge networks are superior to the default bridge network. source: https://docs.docker.com/network/bridge/

 view docker network

sudo docker network ls

run apline container

sudo docker run -dit — name alpine1 alpine ash
sudo docker run -dit — name alpine2 alpine ash

view container list

sudo docker container ls

view network bridge details

sudo docker network inspect bridge

Enter to the alpine1 container

sudo docker network inspect bridge

see ip address

# ip add

Test ping to the internet

# ping -c 3 8.8.8.8

Test to alpine2 container

# ping -c 3 172.17.0.3

Exit the alpine1 container without close the shell

press the ctrl+p, ctrl+q button

Remove the two containers

sudo docker container rm -f alpine1 alpine2

reference : https://docs.docker.com/network/bridge/

Share:

Use Volume Driver on Docker


network graph on openstack


Network topology on Openstack

I use two instance for volume driver

SSH to pod67-node1 floating IP from pod67-node0

ssh -l ubuntu 10.1.1.13

create /share directory

sudo mkdir /share

change directory permission

sudo chmod 777 /share

exit from pod67-node1

exit

Install plugin sshfs

sudo docker plugin install --grant-all-permissions vieux/sshfs

View plugins

sudo docker plugin ls

Disable plugin

sudo docker plugin disable [PLUDIN ID]

Set plugin

sudo docker plugin set vieux/sshfs sshkey.source=/root/.ssh/

Enable plugin

sudo docker plugin enable 86d094668892

View plugins

sudo docker plugin ls

Create volume with driver sshfs

sudo docker volume create — driver vieux/sshfs -o sshcmd=root@10.1.1.13:/share -o allow_other sshvolume

run container with volume

sudo docker run -d — name=nginxtest-ssh -p 8090:80 -v sshvolume:/usr/share/nginx/html nginx:latest

SSH to pod67-node1

ssh -l 10.1.1.13

Add text to file index.html

sudo sh -c "echo 'Hello, I am hakim' > /share/index.html"

See index contents

sudo cat /share/index.html

exit from pod67-node1

exit

Docker ps

sudo docker ps

test the container


let’s back to part 1, introduction to docker volumes.

Share:

Introduction to Docker Volumes


source image:

Volumes are the preferred mechanism for persisting data generated by and used by Docker containers. While bind mounts are dependent on the directory structure of the host machine, volumes are completely managed by Docker. Volumes have several advantages over bind mounts:

  • Volumes are easier to back up or migrate than bind mounts.
  • You can manage volumes using Docker CLI commands or the Docker API.
  • Volumes work on both Linux and Windows containers.
  • Volumes can be more safely shared among multiple containers.
  • Volume drivers let you store volumes on remote hosts or cloud providers, to encrypt the contents of volumes, or to add other functionality.
  • New volumes can have their content pre-populated by a container.

In addition, volumes are often a better choice than persisting data in a container’s writable layer, because a volume does not increase the size of the containers using it, and the volume’s contents exist outside the lifecycle of a given container. source: https://docs.docker.com/storage/volumes/

docker volume

Create docker volume:

sudo docker volume create test-volume

see volumes

sudo docker volume ls

see volume detail

sudo docker volume inspect test-volume

run container with volume

sudo docker run -d — name=nginxtest -v test-volume:/usr/share/nginx/html nginx:latest

see IP address container

sudo docker inspect nginxtest | grep -i ipaddress
docker inspect nginxtest

Test browsing app

curl http:172.17.0.3

test app container IP

Create file index.html and move to source volume directory

sudo echo "This is from test-volume source directory." > index.html

sudo mv index.html /var/lib/docker/volumes/test-volume/_data

Then test again

access the container IP

Run container with read only volume

sudo docker run -d — name=nginxtest-rovol -v test-volume:/usr/share/nginx/html:ro nginx:latest

view nginx container detail

nginxtest-rovol container detail

Let’s move on to part 2 volume driver is here.

reference : https://docs.docker.com/storage/volumes/

Share:

Introduction to Dockerfile Part II

source image : deploybot.com

Create Dockerfile

vim Dockerfile 

Dockerfile content:

# Use an official Python runtime as a parent image
FROM python:2.7-slim# Set the working directory to /app
WORKDIR /app# Copy the current directory contents into the container at /app
ADD . /app# Install any needed packages specified in requirements.txt
RUN pip install — trusted-host pypi.python.org -r requirements.txt# Make port 80 available to the world outside this container
EXPOSE 80# Define environment variable
ENV NAME World# Run app.py when the container launches
CMD ["python", "app.py"] 

Create requirements.txt file

Flask
Redis

Create app.py file

from flask import Flask
from redis import Redis, RedisError
import os
import socket

# Connect to Redis
redis = Redis(host="redis", db=0, socket_connect_timeout=2, socket_timeout=2)

app = Flask(__name__)

@app.route("/")
def hello():
try:
visits = redis.incr("counter")
except RedisError:
visits = "<i>cannot connect to Redis, counter disabled</i>"

html = "<h3>Hello {name}!</h3>" \
"<b>Hostname:</b> {hostname}<br/>" \
"<b>Visits:</b> {visits}"
return html.format(name=os.getenv("NAME", "world"), hostname=socket.gethostname(), visits=visits)

if __name__ == "__main__":
app.run(host=’0.0.0.0', port=80)

Build image from Dockerfile

sudo docker build -t friendlyhello .

See image friendlyhello

sudo docker image ls

Run image friendlyhello

sudo docker run -d -p 4000:80 friendlyhello

See container :

sudo docker container ls

Test app using curl

curl http://localhost:4000

curl localhost

Share:

Intoduction to the Dockerfile

source image : deploybot.com
 Intoduction to the Dockerfile for beginner
 
Docker can build images automatically by reading the instructions from a Dockerfile. A Dockerfile is a text document that contains all the commands a user could call on the command line to assemble an image. source: Dockerfile
Create Dockerfile
vim Dockerfile
 The content Dockerfile
FROM docker/whalesay:latest
RUN apt -y update && apt install -y fortunes
CMD /usr/games/fortune -a | cowsay

The FROM instruction initializes a new build stage and sets the Base Image for subsequent instructions. As such, a valid Dockerfile must start with a FROM instruction. The image can be any valid image – it is especially easy to start by pulling an image from the Public Repositories.

RUN has 2 forms:

  • RUN <command> (shell form, the command is run in a shell, which by default is /bin/sh -c on Linux or cmd /S /C on Windows)
  • RUN ["executable", "param1", "param2"] (exec form)

The RUN instruction will execute any commands in a new layer on top of the current image and commit the results. The resulting committed image will be used for the next step in the Dockerfile.

The CMD instruction has three forms:

  • CMD ["executable","param1","param2"] (exec form, this is the preferred form)
  • CMD ["param1","param2"] (as default parameters to ENTRYPOINT)
  • CMD command param1 param2 (shell form)

There can only be one CMD instruction in a Dockerfile. If you list more than one CMD then only the last CMD will take effect.

Build the Dockerfile

sudo docker build -t docker-whale .

see docker image

sudo docker image ls
docker images
Then run image docker-whale
sudo docker run docker-whale 
run image docker-whale

Reference : https://docs.docker.com/engine/reference/builder/

Share: