 |
Requirements:
- kubernetes version 1.15.11
- haproxy
- docker
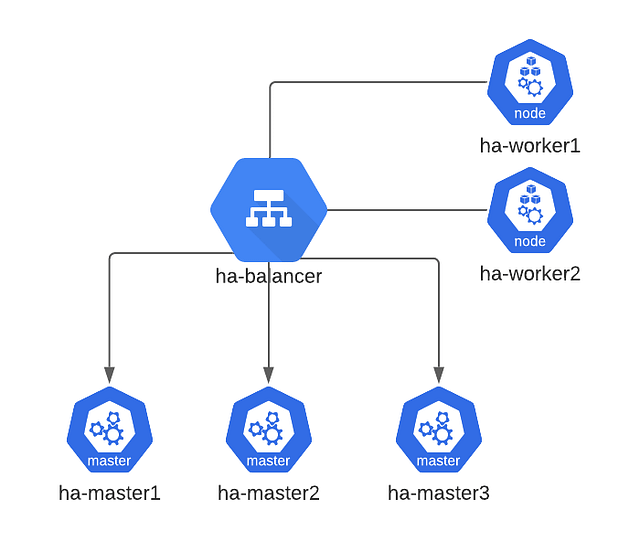
Node list:
- ha-balancer 10.10.10.100
- ha-master1 10.10.10.10
- ha-master2 10.10.10.11
- ha-master3 10.10.10.12
- ha-worker1 10.10.10.20
- ha-worker2 10.10.10.21
On all node execute this command
sudo apt update; sudo apt autoremove -yInstall docker package on ha-master1, ha-master2, ha-master3, ha-node1, ha-node2
sudo apt install -y docker.io=18.09.7-0ubuntu1~18.04.4cat > /etc/docker/daemon.json <<EOF
{
"exec-opts": ["native.cgroupdriver=systemd"]
}
EOFmkdir -p /etc/systemd/system/docker.service.dRestart docker
systemctl daemon-reload
systemctl restart docker
Install kubectl, kubelet & kubeadm on all node master, ha-master1, ha-master2, ha-master3
sudo apt install -y apt-transport-https; curl -s <https://packages.cloud.google.com/apt/doc/apt-key.gpg> | sudo apt-key add -cat <<EOF | sudo tee /etc/apt/sources.list.d/kubernetes.list
deb <http://apt.kubernetes.io/> kubernetes-xenial main
EOFsudo apt update; sudo apt install -y kubelet=1.15.11-00 kubeadm=1.15.11-00 kubectl=1.15.11-00hold kubelet, kubeadm and kubectl
sudo apt-mark hold kubelet kubeadm kubectl
sudo systemctl enable kubelet
disable swap on master node and worker node
sudo swapon -s
swappoff -a
cat <<EOF | sudo tee /etc/sysctl.d/k8s.conf
.bridge.bridge-nf-call-ip6tables = 1
.bridge.bridge-nf-call-iptables = 1
EOFsudo sysctl --system
sudo modprobe br_netfilterInstall and configure haproxy on node ha-balancer
sudo apt update; sudo apt install haproxy -ysudo vim /etc/haproxy/haproxy.cfg...
frontend kubernetes
bind 10.10.10.100:6443
option tcplog
mode tcp
default_backend kubernetes-master-nodes
backend kubernetes-master-nodes
mode tcp
balance roundrobin
option tcp-check
server ha-master1 10.10.10.10:6443 check fall 3 rise 2
server ha-master2 10.10.10.11:6443 check fall 3 rise 2
server ha-master3 10.10.10.12:6443 check fall 3 rise 2
frontend api_server_kubernetes
bind 10.10.10.100:8080
option tcplog
mode tcp
default_backend kube_api_server_kubernetes
backend kube_api_server_kubernetes
mode tcp
balance roundrobin
option tcp-check
server ha-master1 10.10.10.10:8080 check fall 3 rise 2
server ha-master2 10.10.10.10:8080 check fall 3 rise 2
server ha-master3 10.10.10.10:8080 check fall 3 rise 2
...verification haproxy configuration
haproxy -c -V -f /etc/haproxy/haproxy.cfgrestart haproxy service
sudo systemctl restart haproxyGenerate SSH Key on ha-master1 and then copy to other master node
sudo -i
ssh-keygen
cat /root/.ssh/id_rsa.pub
copy ssh key to other master
ssh-copy-id -i /root.ssh/id_rsa root@ha-master2
ssh-copy-id -i /root.ssh/id_rsa root@ha-master3
test ssh to ha-master2 and ha-master3
ssh 10.10.10.11
ssh 10.10.10.12
verification connection to ha-balancer
nc -v 10.10.10.100 6443
nc -v 10.10.10.100 8080
initialitation on ha-master1
vi config.yaml
...
apiVersion: kubeadm.k8s.io/v1beta2
kind: ClusterConfiguration
kubernetesVersion: v1.15.11
controlPlaneEndpoint: "10.10.10.100:6443"
...
kubeadm init --config=config.yaml --upload-certsthe results as below
You can now join any number of the control-plane node running the following command on each as root:kubeadm join 10.10.10.100:6443 --token 71qkw2.ardnuukvwlvhugbt \\
--discovery-token-ca-cert-hash sha256:a8fad41061a6fb20207ebc3fabb5da65cf5dc397ef97c39ce6dc8f62863e5242 \\
--control-plane --certificate-key 6cd223990b20aefad2c394f3217ef9cc10c8625d33f3a8b91bf7da8cad5db74aPlease note that the certificate-key gives access to cluster sensitive data, keep it secret!
As a safeguard, uploaded-certs will be deleted in two hours; If necessary, you can use
"kubeadm init phase upload-certs --upload-certs" to reload certs afterward.Then you can join any number of worker nodes by running the following on each as root:kubeadm join 10.10.10.100:6443 --token 71qkw2.ardnuukvwlvhugbt \\
--discovery-token-ca-cert-hash sha256:a8fad41061a6fb20207ebc3fabb5da65cf5dc397ef97c39ce6dc8f62863e5242mkdir -p $HOME/.kube
sudo cp -i /etc/kubernetes/admin.conf $HOME/.kube/config
sudo chown $(id -u):$(id -g) $HOME/.kube/configmkdir -p $HOME/.kube
sudo cp -i /etc/kubernetes/admin.conf $HOME/.kube/config
sudo chown $(id -u):$(id -g) $HOME/.kube/config
Deploy network CNI, this tutorial we willl use weave network
kubectl apply -f "<https://cloud.weave.works/k8s/net?k8s-version=$>(kubectl version | base64 | tr -d '\\n')"on ha-master2 and ha-master3 join cluster to ha-master1
kubeadm join 10.10.10.100:6443 --token 71qkw2.ardnuukvwlvhugbt \\
    --discovery-token-ca-cert-hash sha256:a8fad41061a6fb20207ebc3fabb5da65cf5dc397ef97c39ce6dc8f62863e5242 \\
    --control-plane --certificate-key 6cd223990b20aefad2c394f3217ef9cc10c8625d33f3a8b91bf7da8cad5db74a
on ha-worker1 and ha-worker2 join cluster as worker node
kubeadm join 10.10.10.100:6443 --token 71qkw2.ardnuukvwlvhugbt \\
    --discovery-token-ca-cert-hash sha256:a8fad41061a6fb20207ebc3fabb5da65cf5dc397ef97c39ce6dc8f62863e5242
verification nodes ready
kubectl get nodes
NAME         STATUS   ROLES    AGE    VERSION
ha-master1   Ready    master   5d3h   v1.15.11
ha-master2   Ready    master   5d3h   v1.15.11
ha-master3   Ready    master   5d3h   v1.15.11
ha-worker1   Ready    <none>   5d3h   v1.15.11
ha-worker2   Ready    <none>   5d3h   v1.15.11
verification all pods running
kubectl get pods -n kube-system
NAME                                 READY   STATUS    RESTARTS   AGE
coredns-66bff467f8-ffhz9             1/1     Running   0          5d3h
coredns-66bff467f8-w2lcw             1/1     Running   0          5d3h
etcd-ha-master1                      1/1     Running   0          5d3h
etcd-ha-master2                      1/1     Running   0          5d3h
etcd-ha-master3                      1/1     Running   0          5d3h
kube-apiserver-ha-master1            1/1     Running   0          5d3h
kube-apiserver-ha-master2            1/1     Running   0          5d3h
kube-apiserver-ha-master3            1/1     Running   0          5d3h
kube-controller-manager-ha-master1   1/1     Running   1          5d3h
kube-controller-manager-ha-master2   1/1     Running   0          5d3h
kube-controller-manager-ha-master3   1/1     Running   1          5d3h
kube-proxy-245hd                     1/1     Running   0          5d3h
kube-proxy-4ckq2                     1/1     Running   0          5d3h
kube-proxy-m62hj                     1/1     Running   0          5d3h
kube-proxy-rpl5t                     1/1     Running   0          5d3h
kube-scheduler-ha-master1            1/1     Running   2          5d3h
kube-scheduler-ha-master2            1/1     Running   0          5d3h
kube-scheduler-ha-master3            1/1     Running   0          5d3h
weave-net-4lkbs                      2/2     Running   2          5d3h
weave-net-526gt                      2/2     Running   2          5d3h
weave-net-bxvkk                      2/2     Running   0          5d3h
weave-net-ts2m2                      2/2     Running   0          5d3h
weave-net-bgsw4                      2/2     Running   0          5d3h
check cluster info
# kubectl cluster-info
Kubernetes master is running at <https://10.10.10.100:6443>
KubeDNS is running at <https://10.10.10.100:6443/api/v1/namespaces/kube-system/services/kube-dns:dns/proxy>
root@ha-master1:~# kubectl get endpoints kube-scheduler -n kube-system -o yaml
apiVersion: v1
kind: Endpoints
metadata:
annotations:
control-plane.alpha.kubernetes.io/leader: '{"holderIdentity":"ha-master2_327fadbe-ec94-43bb-8076-9a1aafa57cd3","leaseDurationSeconds":15,"acquireTime":"2020-10-04T06:25:34Z","renewTime":"2020-10-04T11:06:30Z","leaderTransitions":2}'
creationTimestamp: "2020-09-29T07:05:42Z"
managedFields:
- apiVersion: v1
fieldsType: FieldsV1
fieldsV1:
f:metadata:
f:annotations:
.: {}
f:control-plane.alpha.kubernetes.io/leader: {}
manager: kube-scheduler
operation: Update
time: "2020-10-04T11:06:30Z"
name: kube-scheduler
namespace: kube-system
resourceVersion: "1380211"
selfLink: /api/v1/namespaces/kube-system/endpoints/kube-scheduler
uid: 5c15a8ad-a5fa-4d17-8416-0c97aff0cfe9create example pod
root@ha-master1:~# kubectl run nginx --image=nginx
pod/nginx created
root@ha-master1:~# kubectl get pods
NAME READY STATUS RESTARTS AGE
nginx 1/1 Running 0 18sThanks.